Sometimes when you install a program, it adds itself to the startup due to which causes it to automatically launch when you log in to Windows. In this article I will tell you how you can manually add a program to startup.
METHOD ONE (Using the startup Folder)
1. Find the program or file you want to add to startup and right click on it.
2. Select "Copy"
3. Now open run by pressing
WindowKey + R
4. Type
shell:startup and press enter or click
OK
5. When the startup folder opens, right click the white area.
6. Select "Paste Shortcut"
7. The program is now added to the startup list. It will automatically launch when you will log in to Windows next time.
METHOD TWO (Using Registry Editor)
1. Right click the item you want to add to startup and select "Properties"
2. From the properties you have to note the location of the item (shown by red in the screenshot below), FileName (shown by green in the screenshot below) and extension (shown by orange in the screenshot below). Please note that if you are trying to launch a folder at startup, there will be no extension and the FileName will be the FolderName. You will need these in the coming steps. You can also copy paste these when needed if you do not want to note them down. If so, do not close the properties Window.
3. Press
WindowsKey + R to open run. Type
regedit and press enter or OK.
4. The registry editor will open. In the left pane, navigate to HKEY_LOCAL_MACHINE\SOFTWARE\Microsoft\Windows\CurrentVersion\Run
5. Click the
Run key to see its contents in the right pane. (Make sure that
Run is highlighted blue)
6. Right click in the right pane and select
New >>
String Value
7. Type any name for the string value you just created (Make sure that the name you are going to type is not already used) and press enter.
8. Double click the String Value you just created to open it.
9. In the box below
Value data, you have to type the Location, FileName and extension of the file you noticed in the step 2 in the following format:
"Location\FileName.extension"
For Example:
"C:\Users\Hafiz Muhammad Umer\Pictures\Snapper\snapper.exe"
If you are trying to launch a folder, there will be no extension and the folder name will be used instead of FileName.
10. After typing the Location, FileName and extension in the correct format that I told in the previous step, press
OK. The file will launch at startup.
Fix for some .exe files not starting automatically at startup:
If you notice that any *.exe file (file with extension .exe) is not starting, you will have to apply the following fix. Basically these are the files which require administrator privileges to run. So we are going to disable the User Account Control from the registry. By applying this, if any program will require administrator privileges, the system will grant it the permision without asking you. On some systems it can also cause the Windows Store and Edge browser to stop working. So use it at your own risk.
2. Type "regedit" (without quotes) and press enter.
3. Double click on "HKEY_LOCAL_MACHINE"
4. Double click on "SOFTWARE"
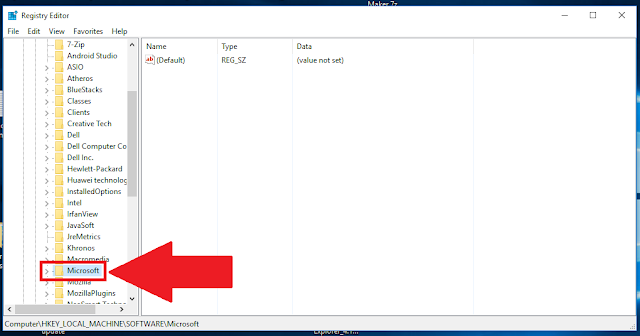
5. Scroll down and double click on "Microsoft"
6. Scroll down and double click on "Windows"
7. Double click on "CurrentVersion"
8. Scroll down and double click on "Policies"
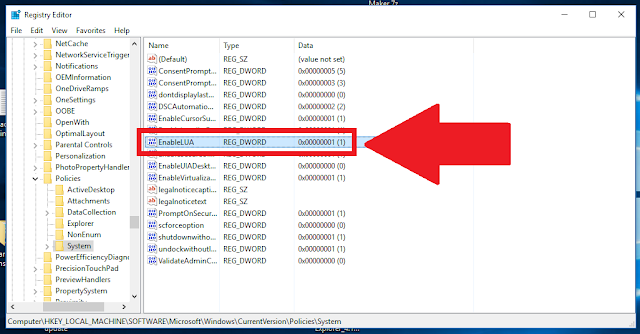
9. Single click on "System"
10. Double click on "EnableLUA" in the right pane.
11. Change "Value data" from 1 to 0
12. Click on "OK"
13. Restart your computer.
Share this article via
Facebook _
Twitter _
Pinterest _
GooglePlus _
Email _
Blogger _
WhatsApp


It's the best time to make some plans for the future and it's time to be happy.
ReplyDeleteI have read this post and if I could I desire to suggest you some
interesting things or tips. Perhaps you can write next
articles referring to this article. I desire to read even more things
about it!
Sure, you can email your suggestions to UmerSoftwares@gmail.com
Delete